
Building a DJI Inspire 2 with Solo Internals - Dev Help Requested! [INSPI-3DR]
- Thread starter Andrew Schmidt
- Start date

You are using an out of date browser. It may not display this or other websites correctly.
You should upgrade or use an alternative browser.
You should upgrade or use an alternative browser.
- Joined
- Jun 6, 2016
- Messages
- 40
- Reaction score
- 24
- Age
- 31
The Inspire is definitely a cool design, but I've always thought raising the arms requires a lot of structure and mechanics just to clear the camera's field of view. And since the Solo's gimbal is more or less locked forward, the usefulness of all that added weight is less... well, useful. Not like the Solo camera can rotate 360 degrees anyway.
To me, it would seem more efficient to either A, just build the frame to not have the front legs in view of the camera. B, mechanically retract just the front legs, or just the legs in general if front/back legs are linked/connected. Or C, lower the camera and gimbal once in flight, but that could exacerbate vibrations getting into the footage.
I'm not criticizing copying the Inspire, it's very cool mechanically. Just suggesting thinking out side the box. I think the biggest thing the Solo could benefit from is more flight time, and to that end, the lightest, simplest frame is where I plan to go when I get time to tear into one of my Solos.

Not to mention the solo is called solo for a reason
to use all that fancy inspire 360 field of view properly you need a second pilot
Legs in shots are not a problem with a proper lens on solo gopro
to use all that fancy inspire 360 field of view properly you need a second pilot
Legs in shots are not a problem with a proper lens on solo gopro
- Joined
- Jun 6, 2016
- Messages
- 40
- Reaction score
- 24
- Age
- 31
Hey Guys, I'ts been a while! Here are some updates! I ended up getting some props, went with the original Inspire 1 1345 props for now because I found them on clearance at MicroCenter for $5 a pair. Drilled through them, balanced, and mounted them to my T-motors. Should be good enough for the first few flights! This thing is gonna be uuuuuge! (Phantom 4 for scale)


Second, I had to rebuild my 3D printer, as the reliability of the print head and auto bed leveling was very poor. After we weekend of pretty much nonstop work, I finally have a printer I am proud of! Here is a photo of successful Carbon ABS prints now that the printer is enclosed")
YouTubes:
Finally, I attempted to print my first chassis design, which got cut off slightly by the printers size, and separate from that, the motherboard doesn't line up all that well. I am going to redesign (again) with the mobo in a different location, and also relocate the battery pin slightly. hopefully, Ill be able to design the battery bay to take two solo batteries. I want to see how solo handles duplicate, fully charged solo smart batteries. Will that crash the smart batteries? will solo not be able to handle the duplicate sm-bus info? or will it take the lower of the two? Only one way to find out! Deeeesign Time! (end goal would be cool to have duplicate batteries at the back, like the inspire)
Ain't no rest for the wicked, Ill keep you all updated!
Second, I had to rebuild my 3D printer, as the reliability of the print head and auto bed leveling was very poor. After we weekend of pretty much nonstop work, I finally have a printer I am proud of! Here is a photo of successful Carbon ABS prints now that the printer is enclosed
YouTubes:
Finally, I attempted to print my first chassis design, which got cut off slightly by the printers size, and separate from that, the motherboard doesn't line up all that well. I am going to redesign (again) with the mobo in a different location, and also relocate the battery pin slightly. hopefully, Ill be able to design the battery bay to take two solo batteries. I want to see how solo handles duplicate, fully charged solo smart batteries. Will that crash the smart batteries? will solo not be able to handle the duplicate sm-bus info? or will it take the lower of the two? Only one way to find out! Deeeesign Time! (end goal would be cool to have duplicate batteries at the back, like the inspire)
Ain't no rest for the wicked, Ill keep you all updated!
- Joined
- Jun 6, 2016
- Messages
- 40
- Reaction score
- 24
- Age
- 31
Toyed around with a dual battery tray design last night, got incredibly close! I am going to see how Solo handles dual batteries next week as it would be sweet to see it treat the data as one source! Also, fijnally got my 3d printer working reliably again.
Video is version two of my battery mount, I plan on epoxying the Solo battery headers into the final version of this. Whenever that is. Version 1 was just a tad too small, so I scaled it up by 1.01. We will go from there.


Video is version two of my battery mount, I plan on epoxying the Solo battery headers into the final version of this. Whenever that is. Version 1 was just a tad too small, so I scaled it up by 1.01. We will go from there.
- Joined
- Jun 6, 2016
- Messages
- 40
- Reaction score
- 24
- Age
- 31
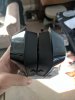
So heres the theory behind my dual smart battery setup. I haven't flown yet, because the project has a bit of work to do before its complete, but the bench test snows that with two equally charged solo smart batteries spliced into the same power header, and same SM bus header, solo has no clue there is a second battery. My hypothesis is that it will make it's calculations based on the overload of SM-bus info (both batteries being repetitively queried) and therefore just think the battery is performing as normal, when in fact, there are two.
I'm no expert in the sm-bus architecture, but I believe it works on a simple get-request architecture and when requesting information, the battery to respond first will be the data it uses. If the two are responding simultaneously , this should result in the solo main board inadvertently running smart battery logic on the cumulative of both sm bus responses....... very similar to if you dump two watering cans into a 5 gallon bucket. Say one is slightly lower than the other, solo will take that information into account, and then when the better performing battery responds, it will think the performance improved a little and go back up.

I have bench tested this, and it seems to work, but I wont know for sure until I get this bad boy up in the air. The goal is a clone of the Inspire 2. dual batteries and all, even though they arent 6s.

Wish me luck guys!
I'm no expert in the sm-bus architecture, but I believe it works on a simple get-request architecture and when requesting information, the battery to respond first will be the data it uses. If the two are responding simultaneously , this should result in the solo main board inadvertently running smart battery logic on the cumulative of both sm bus responses....... very similar to if you dump two watering cans into a 5 gallon bucket. Say one is slightly lower than the other, solo will take that information into account, and then when the better performing battery responds, it will think the performance improved a little and go back up.
I have bench tested this, and it seems to work, but I wont know for sure until I get this bad boy up in the air. The goal is a clone of the Inspire 2. dual batteries and all, even though they arent 6s.
Wish me luck guys!
Attachments
I did as Andru states, Soldered a parallel lead on the distribution board. It reads the main Solo battery and the added in battery just shares the load and drops the load on the main battery.
- Joined
- Aug 8, 2016
- Messages
- 29
- Reaction score
- 8
- Location
- Santa Cruz, CA
- Website
- monitorenvironmental.com
So heres the theory behind my dual smart battery setup. I haven't flown yet, because the project has a bit of work to do before its complete, but the bench test snows that with two equally charged solo smart batteries spliced into the same power header, and same SM bus header, solo has no clue there is a second battery. My hypothesis is that it will make it's calculations based on the overload of SM-bus info (both batteries being repetitively queried) and therefore just think the battery is performing as normal, when in fact, there are two.
I'm no expert in the sm-bus architecture, but I believe it works on a simple get-request architecture and when requesting information, the battery to respond first will be the data it uses. If the two are responding simultaneously , this should result in the solo main board inadvertently running smart battery logic on the cumulative of both sm bus responses....... very similar to if you dump two watering cans into a 5 gallon bucket. Say one is slightly lower than the other, solo will take that information into account, and then when the better performing battery responds, it will think the performance improved a little and go back up.
View attachment 5628
I have bench tested this, and it seems to work, but I wont know for sure until I get this bad boy up in the air. The goal is a clone of the Inspire 2. dual batteries and all, even though they arent 6s.
View attachment 5630
Wish me luck guys!
Good Luck!! Seriously impressive.
- Joined
- Jun 6, 2016
- Messages
- 40
- Reaction score
- 24
- Age
- 31
Here's a test video of the 2nd batt in parallel on my rebuilt Solo.
Awesome Andru. How much longer overall was your increase in flight time with the larger props/motors and dual battery setup? And also, did you need an arduino to setup the retractable landing gear? if so, what pins did you tap into? that is my current struggle, figuring out which pins to wire my Servo into.
- Joined
- Jun 6, 2016
- Messages
- 40
- Reaction score
- 24
- Age
- 31
Also here's another update!
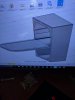
I finally got the structural plan for the main chassis figured out in a manner that allows for the 3DR Solo main board to be accessible without being annoying. I chose to create an underslung style mounting plate that doubles as structural reinforcement. This coupled with my battery tray and modified frame lower allows for a somewhat rigid setup! The goal was to be able to print this and maintain the Inspire-esque looks from the first desgins done by BlackBoxRC and Fragmaster. There will most likely be some architectural revisions down the road, but so far, I am very please with how this is turning out! Very Inspire2 esque with the dual battery and 22mm tube frame!. I am currently printing all the little bits and the frame lower so I can start test fitting the mechanical side of things. Hopefully I'll have a partial frame assembled by mid week, as I am still waiting on the 4th motor from ebay, and the remaining CF tubing from China.
Printer hammering out structural parts -
www.youtube.com/watch?v=o91sbPN6SWw
Looking at the current render, you will notice the design is wider than it is long. Now that I have a realistic representation of how this beast is going to piece together, I can start cutting pieces down to hit my goal of a 450x450 frame size. However I have to make sure I retain clearance for those monster 1345 DJI props. Apparently my 1240 carbon fiber props came in two weeks ago.... but the mail man tossed them under the front porch instead of in the mailbox... so yeah, finally found those, but gonna try flying with the DJI props first. Here's my first render of the assembled design. Done in Fusion360.

And here is the current state of the build. Two parts down. Time to figure out how I am going to manage all these cables next.

Thanks again guys, I really appreciate all the input I'm getting on this!
I finally got the structural plan for the main chassis figured out in a manner that allows for the 3DR Solo main board to be accessible without being annoying. I chose to create an underslung style mounting plate that doubles as structural reinforcement. This coupled with my battery tray and modified frame lower allows for a somewhat rigid setup! The goal was to be able to print this and maintain the Inspire-esque looks from the first desgins done by BlackBoxRC and Fragmaster. There will most likely be some architectural revisions down the road, but so far, I am very please with how this is turning out! Very Inspire2 esque with the dual battery and 22mm tube frame!. I am currently printing all the little bits and the frame lower so I can start test fitting the mechanical side of things. Hopefully I'll have a partial frame assembled by mid week, as I am still waiting on the 4th motor from ebay, and the remaining CF tubing from China.
Printer hammering out structural parts -
www.youtube.com/watch?v=o91sbPN6SWw
Looking at the current render, you will notice the design is wider than it is long. Now that I have a realistic representation of how this beast is going to piece together, I can start cutting pieces down to hit my goal of a 450x450 frame size. However I have to make sure I retain clearance for those monster 1345 DJI props. Apparently my 1240 carbon fiber props came in two weeks ago.... but the mail man tossed them under the front porch instead of in the mailbox... so yeah, finally found those, but gonna try flying with the DJI props first. Here's my first render of the assembled design. Done in Fusion360.
And here is the current state of the build. Two parts down. Time to figure out how I am going to manage all these cables next.
Thanks again guys, I really appreciate all the input I'm getting on this!
Last edited:
- Joined
- Jun 6, 2016
- Messages
- 40
- Reaction score
- 24
- Age
- 31
Also, I am going to try and print Vlad's arm joints instead of the Blackbox RC arm joints...... the blackbox ones are clunky as hell.
Read the comment section in my YT video for Flight time improvement. No need for arduino. Use pause button and rc7.Awesome Andru. How much longer overall was your increase in flight time with the larger props/motors and dual battery setup? And also, did you need an arduino to setup the retractable landing gear? if so, what pins did you tap into? that is my current struggle, figuring out which pins to wire my Servo into.
- Joined
- Jun 6, 2016
- Messages
- 40
- Reaction score
- 24
- Age
- 31
Read the comment section in my YT video for Flight time improvement. No need for arduino. Use pause button and rc7.
Nice Andy, I know the one guy was asking about performance in your comments, did you notice a top speed increase? Or would this be something you would be willing to test? I know stock solo Almost hit 35 on a calm day.
I am not much of a speed demon so no i will not be testing it.Nice Andy, I know the one guy was asking about performance in your comments, did you notice a top speed increase? Or would this be something you would be willing to test? I know stock solo Almost hit 35 on a calm day.
- Joined
- Jun 6, 2016
- Messages
- 40
- Reaction score
- 24
- Age
- 31
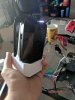
OKAY, now we are cooking! I finally started getting a realistic mock-up of how this design is going to pan out towards the end of last week. After multiple revisions, and two more killed rolls of PLA. I've Got something I am cool with moving forward with. Currently trying to print the ABS functional parts, and still waiting on a lot of stuff from China, but here's a teaser! (I've only got half the Carbon fiber so far, so only able to mock-up half the drone, sorry guys.
Final Print should be something like
Canopy/Body Trim - White PLA @ 20% infill
Mechanical/Load Bearing Parts - Black ABS@ 40-50%infill
Cosmetic Parts/Non Torsion Bearing - Carbon ABS @50% infill.
Basically, Anything currently Red, is going to be ABS, except the battery tray.
The ESC Holding Feet will be Carbon, and the Canopy will be HoneyComb Lightly infilled PLA.
Trying to keep this sucker light, but the damn batteries are HEAAVYY. Luckily, she will run on one or two, depending on if I want speed or endurance.
OH OH OH, and I found out that Gen 1 Inspire Quick release prop hubs fit my motors!!! So this thing is gonna get quick release props to boot!!!!
Maybe sometime down the road, Ill make it collapse-able, that would be sweet.
Any way, here are the photo updates!
1- Best lighting, but central chassis was remodeled 14 times and reprinted 3 more times after this.
2- Current airframe. Revsion 42 of the lower chassis is currently being printed. It will be peppermint in color, as I ran out of white and replaced the roll with remaining red pla lol.

3- Another shot of the mock-up from image 1 - Body changes coming up, as well as lighter motor hubs replacing the T-motor screw on style. Also, ignore the hole in the nosecone, that print ran out of PLA.
Final Print should be something like
Canopy/Body Trim - White PLA @ 20% infill
Mechanical/Load Bearing Parts - Black ABS@ 40-50%infill
Cosmetic Parts/Non Torsion Bearing - Carbon ABS @50% infill.
Basically, Anything currently Red, is going to be ABS, except the battery tray.
The ESC Holding Feet will be Carbon, and the Canopy will be HoneyComb Lightly infilled PLA.
Trying to keep this sucker light, but the damn batteries are HEAAVYY. Luckily, she will run on one or two, depending on if I want speed or endurance.
OH OH OH, and I found out that Gen 1 Inspire Quick release prop hubs fit my motors!!! So this thing is gonna get quick release props to boot!!!!
Maybe sometime down the road, Ill make it collapse-able, that would be sweet.
Any way, here are the photo updates!
1- Best lighting, but central chassis was remodeled 14 times and reprinted 3 more times after this.
2- Current airframe. Revsion 42 of the lower chassis is currently being printed. It will be peppermint in color, as I ran out of white and replaced the roll with remaining red pla lol.
3- Another shot of the mock-up from image 1 - Body changes coming up, as well as lighter motor hubs replacing the T-motor screw on style. Also, ignore the hole in the nosecone, that print ran out of PLA.
- Joined
- Aug 8, 2016
- Messages
- 29
- Reaction score
- 8
- Location
- Santa Cruz, CA
- Website
- monitorenvironmental.com
- Joined
- Jun 6, 2016
- Messages
- 40
- Reaction score
- 24
- Age
- 31
So after quite a bit of struggle, My printer is up and running again. Its amazing how fast you can jam up a well running machine with improperly labeled filament. Worksteel's PLA filament is very VERY temperature sensitive and will actually begin to jam even the best assembled v6/titan combo if printed too hot. Thusly, After having to rebuild my print head again, I've decided to go with a different brand of PLA that prints at normal PLA temperatures and has a more pure-white look. Maybe down the road ill go carbon, but for now, I just want this thing to look like a big ass inspire.
I should have build progress videos up by Sunday, yesterday my friend Alex was nice enough to lend me his Nikon D3200. So here goes build videos and the start of a real YouTube Channel!
As far as the current hurdle, I have been talking to Andru about the RC7-(pwm CH7)-pin 19 functionality he used in his Reincarnated Solo project. My current issue is that I need my servo to run in a specific direction for a specific distance, meaning I believe I have two options.
Option 1 Setup wiring like Andy has, and somehow find a way to make the servo do X many rotations to move the landing gear all the way up... and then reverse the function to bring them back down. (this is with the pause button.)
Option 2: Add an arduino micro running off of a BEC that is hooked up to RC7, so that when RC7 is triggered, it would run logic to check which Endstop is triggered, if the lower endstop is currently triggered (meaning landing gear is down) move the servo until upper is triggered. Else (meaning if the lower is not triggered, move the servo in reverse until the lower is triggered. (landing mode).
I think I'm gonna need option 2, but I have to figure out how to ride definite code in Arduino, as currently my expertise only extends past troubleshooting Marlin configurations for RepRap.
Hopefully Ill have better info for you guys Sunday or Monday!
I should have build progress videos up by Sunday, yesterday my friend Alex was nice enough to lend me his Nikon D3200. So here goes build videos and the start of a real YouTube Channel!
As far as the current hurdle, I have been talking to Andru about the RC7-(pwm CH7)-pin 19 functionality he used in his Reincarnated Solo project. My current issue is that I need my servo to run in a specific direction for a specific distance, meaning I believe I have two options.
Option 1
Setup wiring like Andy has, and somehow find a way to make the servo do X many rotations to move the landing gear all the way up... and then reverse the function to bring them back down. (this is with the pause button.)Option 2: Add an arduino micro running off of a BEC that is hooked up to RC7, so that when RC7 is triggered, it would run logic to check which Endstop is triggered, if the lower endstop is currently triggered (meaning landing gear is down) move the servo until upper is triggered. Else (meaning if the lower is not triggered, move the servo in reverse until the lower is triggered. (landing mode).
I think I'm gonna need option 2, but I have to figure out how to ride definite code in Arduino, as currently my expertise only extends past troubleshooting Marlin configurations for RepRap.
Hopefully Ill have better info for you guys Sunday or Monday!
Similar threads
- Locked
- Replies
- 50
- Views
- 5K
- Replies
- 1
- Views
- 2K
- Replies
- 16
- Views
- 4K
- Replies
- 10
- Views
- 6K