- Joined
- Oct 20, 2017
- Messages
- 33
- Reaction score
- 1
- Age
- 34
T-2dPost above yours has links to the Pinouts Also what type of Gimbal as in model number?


T-2dPost above yours has links to the Pinouts Also what type of Gimbal as in model number?
What are the specs how much voltage can it handle as in can you hook it up to a 4S battery 15 volts?T-2d
Please provide me with any image o diagram if you can, and I can't find thePin 1 and 3 will provide power and ground
Pin 14 will be your channel 6 PWM out to gimbal which is the paddle tilt on controller, you will also need to use the ground pin 3
You do not need it if you open the solo and solder directly to the pins from the topPlease provide me with any image o diagram if you can, and I can't find the
Extend 3DR Solo Accessory Bay, no we're?
Show me a image of one of yours of anythingYou do not need it if you open the solo and solder directly to the pins from the top
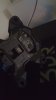
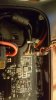
Its not apart at the moment no pics, Here is one I found online you can see the connections at the topShow me a image of one of yours of anything


Here I made a quick schematic you will need to solder 2 grounds 1 power wire and 1 signal wire,Great I'm going to get my tools and star that's the only thing I need just the the black and red wired what else?

Yeah im online all night I work online so yup im hereHey are you still there I'm on the process to do it i was buying some tools
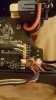
Kool what I'm going to do is open it and I will send you the picture of my solo motherboard and the tarot motherboard so you can point me the correct wire with different colorYeah im online all night I work online so yup im here
Do not touch any of thatBetter?
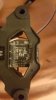
First point on left is power that goes to red lead power on the gimbal its labeled 1 Have you done this type of stuff before?Yes see it
Yea I have done it just I don't wanna damage itFirst point on left is power that goes to red lead power on the gimbal its labeled 1 Have you done this type of stuff before?
Ok just dont apply to much heat use fine wires and tape them down afterwards when all are soldered in place.Yea I have done it just I don't wanna damage it
Okay I install everything you told me s blue light light up on the tarot what's it mean and I coulnt find the pwm to enableOk just dont apply to much heat use fine wires and tape them down afterwards when all are soldered in place.
Okay I install everything you told me s blue light light up on the tarot what's it mean and I coulnt find the pwm to enable
We use essential cookies to make this site work, and optional cookies to enhance your experience.