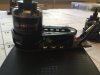
THANK YOU @RichWest for this beautiful T-Motor build. The skill you put into this is just sick. And they run sooo.......nice. It's a night & day difference. I'll be installing your gimbal ball invention tomorrow. And thanks for ALL your help here @3DRPILOTS.

Merry T-Motor!
- Thread starter Solo Keith
- Start date

You are using an out of date browser. It may not display this or other websites correctly.
You should upgrade or use an alternative browser.
You should upgrade or use an alternative browser.

- Joined
- Mar 12, 2016
- Messages
- 3,920
- Reaction score
- 2,626
Wow those look sexy. I mean, that makes me hope my motors burn out at 12 months and 1 day.
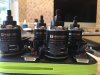
Glad they arrived safe and sound. Hopefully they'll provide you with the same experience that I've had with my upgraded motors. They do sound amazing, just like they should...
Again, a big thanks goes out to @RolandS888 for his guidance on the upgraded T-Motors selection. If not for his efforts and experience most of us would still be arguing about bearings and how often to oil or replace.... You da'man.
Again, a big thanks goes out to @RolandS888 for his guidance on the upgraded T-Motors selection. If not for his efforts and experience most of us would still be arguing about bearings and how often to oil or replace.... You da'man.
- Joined
- Jul 1, 2015
- Messages
- 654
- Reaction score
- 163
- Age
- 49
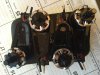
hello can you visualise how to identify the a b c on tmotors wire due of all black colors becoz im planning to buy too, thanksTHANK YOU @RichWest for this beautiful T-Motor build. The skill you put into this is just sick. And they run sooo.......nice. It's a night & day difference. I'll be installing your gimbal ball invention tomorrow. And thanks for ALL your help here @3DRPILOTS.
@pyrate made a diagram in the motor swap thread...it correctly orients to CW or CCW. The main thing is to mark your wires as 1 - 2 - 3 about 2-3" out from the motor, I drew dots with a silver sharpie onto each wire.
Don't think color. Think left, middle, right. Then just connect them the same as the ones you removed for each pod.
- Joined
- Jun 4, 2015
- Messages
- 2,911
- Reaction score
- 1,699
- Age
- 68
I used regular modeler's super glue, medium viscosity and a quick shot of accelerator. Just did my 2nd set of 4 pods for the new solo I just received on the BB deal.that diagram is on the original thread, I found it helpful
Hey guys I tried hot glue to keep the pods together after removing the little plastic posts thath held the other ones together.
Is there a stronger glue that will not kill a PCB
- Joined
- Jul 1, 2015
- Messages
- 654
- Reaction score
- 163
- Age
- 49
It would be helpful if there is a digram to follow honestly im not expert in rc thing im worried if i had a mistake to swap instead of thrusting up it could going down hahaha
It would be helpful if there is a digram to follow honestly im not expert in rc thing im worried if i had a mistake to swap instead of thrusting up it could going down hahaha
Read Roland's T-Motor swap post. And then when your done read it again if you need to.
There is also plenty of pictures if your not into reading.
Sent from my iPhone using Tapatalk
I actually re-pressed the original plastic tabs on Keith's build, as I used heat to release the tabs when disassembling. Reversing that process by heating the tabs with a hot air solder wand, used an 1/8" metal rod end and pressed them down to the board. I was amazed at how well it turned out, the pod's are tight. Wish he would have taken a picture of that aspect...hint-hint...that diagram is on the original thread, I found it helpful
Hey guys I tried hot glue to keep the pods together after removing the little plastic posts that held the other ones together.
Is there a stronger glue that will not kill a PCB
But sure, what did others do to re-assemble their pods? Jub's CA method seems ideal if your method was to cut off the tabs. I need to get some CA accelerator....
There are a number of 2-part epoxies that would probably work well too.I used regular modeler's super glue, medium viscosity and a quick shot of accelerator. Just did my 2nd set of 4 pods for the new solo I just received on the BB deal.
")
Here's one with a self-mixing tube:

I made an ABS (plastic) paste using ABS plastic from my 3d printer and a little acetone. The acetone dissolves the ABS and makes a paste after awhile. Just use it like glue and apply a little dab with a toothpick. It hardens and bonds just as well to the original plastic, which I believe is also ABS. Not for everyone, but if you happen to have a 3d printer around it works great.I actually re-pressed the original plastic tabs on Keith's build, as I used heat to release the tabs when disassembling. Reversing that process by heating the tabs with a hot air solder wand, used an 1/8" metal rod end and pressed them down to the board. I was amazed at how well it turned out, the pod's are tight. Wish he would have taken a picture of that aspect...hint-hint...
But sure, what did others do to re-assemble their pods? Jub's CA method seems ideal if your method was to cut off the tabs. I need to get some CA accelerator....
Epoxy won't damage the PCB. A lot of PCB's are actually coated with epoxy. Just don't get it on any actual components as it *could* lift the part when setting, and seeing as how they used leadless solder which isn't very strong, I'd definately steer clear of getting it on a component. On the surface of the board... shouldn't be a problem. Epoxy is also non-conductive.
Interesting idea, I will give it a try....I made an ABS (plastic) paste using ABS plastic from my 3d printer and a little acetone. The acetone dissolves the ABS and makes a paste after awhile. Just use it like glue and apply a little dab with a toothpick. It hardens and bonds just as well to the original plastic, which I believe is also ABS. Not for everyone, but if you happen to have a 3d printer around it works great.
I got acetone, just need some ABS to play with...hmmm...
Who me? Selling a motor upgrade? Nope, owed Keith a favor. Come to think of it, where's @Solo Keith ?Are these something you are selling?
Similar threads
- Replies
- 5
- Views
- 4K
- Replies
- 10
- Views
- 5K
- Replies
- 3
- Views
- 2K
- Replies
- 7
- Views
- 2K
New Posts
-
-
-
 Free Music / SFX Resource for Your Videos - Over 2000 Tracks
- Latest: Eric Matyas
-
-