Generic Battery + Arduino = Happy Solo

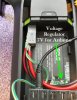
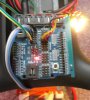
With this code the voltage of each individual cell is sent through to the Solo (which then adds them to give total voltage) as that is now what is requested rather than the 3DR firmware which requested just total voltage. The remaining capacity is worked out as a 0-100% of 5200mAh based on the total voltage. The 0% and 100% voltages are programmed so can set as required before programming the Arduino.

I am not sure if there is individual cell set points for RTL in the 3.7 version.
 
I am not sure if there is individual cell set points for RTL in the 3.7 version.
Not to my knowledge.
But you may trigger action from the Arduino, eg by setting Solo to RTH via mavlink when a cell is going down. Or to trigger the LEDs, or buzzer,...
 
Hi fpvsteve,

The Arduino board in this setup is just pretending to be a Solo smart battery and delivering data to the Solo from a standard battery. Currently all it does is respond to the requests from the Solo. I have tested a set of 8 Neopixel LED's to give battery level by dropping LED's and changing colour as the voltage drops. There are plenty of outputs available so could add external buzzers etc if the difference between cells gets too large or voltage drops below a certain level.

Once i have this setup running delivering the basics of being able to use any 4S lipo battery on the Solo i am happy to look to add features if people would like.
 
  • Like
Reactions: Wetstone
I took to the circuit board from my opened battery and cut it just past the plug. (It looks like the +ve is always on and the negative is switched when the battery is turned on). I sanded back the -ve section of the board and soldered on a lead to an XT60. I moved the -ve lead (after the photo) to the same position as the +ve lead (with a better soldering job this time) so it as a better fir in the case. I also removed the +ve lead i cut and then soldered in the other lead for the XT60. I then added 2 wires for the I2C bus. I iwll then glue this back into the case once i finish my voltage divider board and program up my Arduino. Steps forward........

10151
10154
10152
10153
 
Last edited:
  • Like
Reactions: Derriell
I have joined all my code I have been testing together.
SMBus communication
Voltage divider for cell measurement
Neopixel LEDs for remaining capacity.

I have allowed the high and low limits of the cells and the actual values for the voltage divider resistors to be set before down loading the code.

I have also been testing an OP amp as a differential voltage monitor so I can connect each cell directly and get a reading. This may work but looks like it could involve a lot more resistors and a cheap LM324. This will make a bigger circuit so may just stick with the voltage divider.

I have ordered another current monitor with express delivery so hope to get that early in the week and can then finish off my program and get some testing under way.
 
I have managed to get some time and have done a test powering up the solo.
Picture 0
I have installed a voltage regulator to provide the Arduino with 7V from the 14.8V battery. I was having issues with accurate readings of the cells powering the Arduino from the PC's USB. The voltage regulator fixed that and will be needed as part of the install.
Picture 1
I am using a 5S battery to provide 4 cells for the voltage divider and this is the reading that the Solo is getting. I am using a power supply set to 15v to provide the power to the Solo (and voltage regulator).
Picture 2
Voltage divider. I have used a 5 pin plug for the voltage divider (to connect to a standard 4S battery) and then added a 6 pin plug to connect up my 5S battery with a lead to connect the first 4 cell to the divider.
Picture 3
I am using an Arduino Uno with a shield to make connections easy for testing. Once the current monitor is here and tested i will solder all the connections to an Micro or Pro Mini.
Picture 4
The Neopix indicating the battery level. Battery is 64% so 5 Orange are on.
>90% - 8 Green
>80% - 7 Green
>70% - 6 Green
>60% - 5 Orange
>50% - 4 Orange
>40% - 3 Orange
>30% - 2 Red Flashing
<30% - 1 Red Flashing
Picture 5
Power supply set at 15V and Solo drawing 718mA.
Picture 6
Solex showing 15.09V (from the 4 cells connected to the voltage divider) and 64% remaining (based on high (4.2V) and low (3.0V) battery levels. The low level can be set an any value. I set it at 3V for testing.
Picture 7
Solex showing the battery disconnected. The current is fixed at 2A as i don't have the current unit yet for testing.

Good progress has been made. I have tested this with original 3DR firmware, Open Solo 3 and the 3.7 Dev and all work as expected.

I am just waiting on the current module which i should get this week (fingers crossed) and can make a final push to finished setup.
 

Attachments

  • Solo 0.jpg
    Solo 0.jpg
    60.8 KB · Views: 97
  • Solo 1.jpg
    Solo 1.jpg
    87.3 KB · Views: 94
  • Solo 2.jpg
    Solo 2.jpg
    72.2 KB · Views: 96
  • Solo 3.jpg
    Solo 3.jpg
    56.4 KB · Views: 97
  • Solo 4.jpg
    Solo 4.jpg
    41.3 KB · Views: 100
  • Solo 5.jpg
    Solo 5.jpg
    37.3 KB · Views: 98
  • Solo 6.jpg
    Solo 6.jpg
    82.9 KB · Views: 92
  • Solo 7.jpg
    Solo 7.jpg
    74.5 KB · Views: 90
My ACS758LCB-050B current module arrived and i have got it up and running.

Attached is the code I have used for my Arduino.

I have tested this with the above setup and all the data is coming through in Mission Planner.

I just need to make myself a small circuit board for the voltage divider and may look to add in the current chip as well to make the setup as small as possible.

For a "real world" test i just need to see if i can borrow a 4S lipo and strap this all in and see if i can get my Solo up in the air.....

I am happy for any help in refining the code or adding anything that might be missing.

I am looking at adding a set of dip switches so the serial number can be set for each battery so Solex can log each one. This is a nice to do rather than a requirement.
 

Attachments

  • Solo_SMBus.zip
    5 KB · Views: 24
  • Like
Reactions: pious_greek
Thanks for that. It is to similar ones from TI I have looked at. They can measure each cells voltage along with other functions. They have an I2C bus for easy coms with an arduino. The issue is they are surface mounted items which I don't have any means to solder or a PCB for them.
 
Thanks for that. It is to similar ones from TI I have looked at. They can measure each cells voltage along with other functions. They have an I2C bus for easy coms with an arduino. The issue is they are surface mounted items which I don't have any means to solder or a PCB for them.
If you [or anyone else, frankly] want to build a future battery system for all of us with Solos round this part, I'll get some of these chips soldered onto breakout boards and sent off to you. Say the word.
 
I will have a good look into the different chip options and see what would be the best. Not having to use the resistor voltage divider would stop the need for any calibration/setup and could allow you to look at the 12 cells setup you are considering.

Looking at a couple of the data requests that the Solo makes there is no data for these in the SMBus manual.
looninho had tried the current data request on a laptop batter and got no response so maybe 3DR had a modified SMBus chip made. That might make using a standard SMBus chip directly not possible. When i was looking at these types of chips i though i could connect the cells up and use the chip to supply the info to the arduino and then the arduino send this on to the Solo.

I will have another look at the different chips as they can be quite cheap and make a circuit nice and simple. In the ideal world a PCB could be designed with one of the above chips, an arduino chip (so it could be programmed and modified as required) and current chip with a some plugs for the balance plug, XT60 and small plugs for LED indication.
 
Last edited:
In the ideal world a PCB could be designed with one of the above chips, an arduino chip (so it could be programmed and modified as required) and current chip with a some plugs for the balance plug, XT60 and small plugs for LED indication.

Some of the TI options like the Maxim Integrated option above have on board microprocessors so you can skip the arduino altogether.... of course you have to learn a new programming language, use different chip programming equipment which can be a bit of an impediment, but its probably closer to the final destination...

just slightly related, here is another arduino project which involves interacting with smart batteries over smbus, albeit directed at laptop batteries:
PackProbe Documentation
 
I have had a look as some of the different IC's and they all appear to be designed to stay with a battery and monitor its input and output current flow to decide on the remaining capacity. They have lots of smarts (coulomb-counting etc) and appear to not just provide a simple voltage reading for each cell.

If someone has more knowledge of these and can point me in the direction of an IC that could be used just for voltage measurement (and maybe current) that would be appreciated.
 
I have managed to get some time and have done a test powering up the solo.
Picture 0
I have installed a voltage regulator to provide the Arduino with 7V from the 14.8V battery. I was having issues with accurate readings of the cells powering the Arduino from the PC's USB. The voltage regulator fixed that and will be needed as part of the install.
Picture 1
I am using a 5S battery to provide 4 cells for the voltage divider and this is the reading that the Solo is getting. I am using a power supply set to 15v to provide the power to the Solo (and voltage regulator).
Picture 2
Voltage divider. I have used a 5 pin plug for the voltage divider (to connect to a standard 4S battery) and then added a 6 pin plug to connect up my 5S battery with a lead to connect the first 4 cell to the divider.
Picture 3
I am using an Arduino Uno with a shield to make connections easy for testing. Once the current monitor is here and tested i will solder all the connections to an Micro or Pro Mini.
Picture 4
The Neopix indicating the battery level. Battery is 64% so 5 Orange are on.
>90% - 8 Green
>80% - 7 Green
>70% - 6 Green
>60% - 5 Orange
>50% - 4 Orange
>40% - 3 Orange
>30% - 2 Red Flashing
<30% - 1 Red Flashing
Picture 5
Power supply set at 15V and Solo drawing 718mA.
Picture 6
Solex showing 15.09V (from the 4 cells connected to the voltage divider) and 64% remaining (based on high (4.2V) and low (3.0V) battery levels. The low level can be set an any value. I set it at 3V for testing.
Picture 7
Solex showing the battery disconnected. The current is fixed at 2A as i don't have the current unit yet for testing.

Good progress has been made. I have tested this with original 3DR firmware, Open Solo 3 and the 3.7 Dev and all work as expected.

I am just waiting on the current module which i should get this week (fingers crossed) and can make a final push to finished setup.

Webbs,

Massive thank you for all the work that you have put into this project. We are mapping company that has a few Solo's that we are trying to keep running and this looks like our way forward. Do mind sharing your current schematic so that I can duplicate the project and test the system as well. I would like the opportunity to give you some great feedback. I have a little electronics experience and maybe I can help as well.

Kind Regards,

Perry
Hi Perry,

Near the end on page 2 there is a post from the 7th May. There is a PCB layout i had created for the voltage divider. I tried to make it on my CNC but the adapter i have for the small V bits has too much runout so currently i cant make it. I have just used some veroboard to make it. This weekend i hope to get a bit of time to cut it to size and 3D print a holder for it, the Arduino, LEDs and current sensor and solder it all up in a semi finished state.

If this works someone with a better knowledge of PCB/circuit design could design a surface mount version and incorporate the current sensing chip and an arduino for an all in one package.

The arduino code i am currently using is there as well.

I am happy for any suggestions or help with refining both the circuit and code.
 
  • Like
Reactions: Wetstone
Hi Perry,

Near the end on page 2 there is a post from the 7th May. There is a PCB layout i had created for the voltage divider. I tried to make it on my CNC but the adapter i have for the small V bits has too much runout so currently i cant make it. I have just used some veroboard to make it. This weekend i hope to get a bit of time to cut it to size and 3D print a holder for it, the Arduino, LEDs and current sensor and solder it all up in a semi finished state.

If this works someone with a better knowledge of PCB/circuit design could design a surface mount version and incorporate the current sensing chip and an arduino for an all in one package.

The arduino code i am currently using is there as well.

I am happy for any suggestions or help with refining both the circuit and code.

Webbs,

Thanks for your reply. I haven't found where you have linked up the current sensor. Am I missing something. Thanks for your response.

Kind regards,

Perry
 
The current sensor is a ACS758LCB-050B. I purchased one from Banggood (and a 100A version one from eBay).

US$6.94 % CJMCU-758 ACS758LCB-050B-PFF-T Linear Current Sensor Hall Current Module For Arduino Module Board For Arduino from Electronics on banggood.com

This one comes with the additional components on a board. Just the ACS758LCB-050B could be purchased and mounted on a all in one circuit board with only a couple of extra components.

View attachment 10278

Webbs,

Thanks so much for your information. I have managed to get the voltage working which is a fantastic step forward for us. I have just ordered the NeoPixel and the current sensor, so looking forward to a longer life with our Solo's.

Kind regards,

Perry.
 
Webbs,

Thanks so much for your information. I have managed to get the voltage working which is a fantastic step forward for us. I have just ordered the NeoPixel and the current sensor, so looking forward to a longer life with our Solo's.

Kind regards,

Perry.
That is great news. Which Arduino are you using?

I have plans to mount the Arduino and voltage divider on some veroboard this weekend (I always have great plans for my weekends) and see if i can then print a case to hold it.
 
I have just been checking some of the pin details for the arduino board and i was looking at power options for the board. I had decided to us a 5V regulator (LM7805C ) for the 5V pin after using a DC Buck converter to drop the 14.8V down to just over 7.5V. I found that you can provide your own voltage for the AREF pin so using the same regulated 5V for this should give an accurate reference for the voltage readings. The Arduino needs the following code in the setup (before using analogRead).

Code:
analogReference(EXTERNAL); // use AREF for reference voltage

I will need to get one of these regulators from my local jarcar next time i am out (or online from RS) and give it a test.
 

Members online

Forum statistics

Threads
13,093
Messages
147,741
Members
16,048
Latest member
ihatethatihavetomakeanacc