There appears to be a small sub-culture here who use the Solo as a mobile tri-pod for small still image cameras. The hope is to get higher still image quality than the GP4 or similar action cameras. I wanted to give an update on the mounting and camera control options that have worked best for me. So many people here have been a huge help and are so giving of their time.
Much appreciated.
Setup Notes:
I use a Sony alpha series, APC C/25 MP sensor for drone images. I shoot Raw in continuous bracket mode most of the time.
HDMI to the Sony works fine and the live video feed from the camera comes through on Solex, SidePilot or the Solo app. The LCD display of the camera is shown with whatever display option you set on the camera so you can see the full exposure settings if you require-- as I do. Know your camera settings. If the camera is mounted upside down, you need to use Solex in “flip screen” mode to see a right side up image in the app.
For the new camera remote device, the drone and the camera remote equipment need to be on and connected to the Sony BEFORE the Sony can be turned on. If I need to be very precise about composition, I will use an iPad in lieu of the smaller Nexus android device (with a custom controller grip mount).
You’re gonna need leg extenders. Am working with another forum member on a gimbal for the Sony. The lens on the Sony is a 16-50mm zoom. Very light and decent optics but not great. Fun to be able to now adjust the power zoom in the air. I will likely go with a wider 9mm prime, which may alter the mounting choices and location.
Weight estimates: camera, lens, with battery is 14.2 oz/410grams; the Camera remote stuff and mounting gizmos add another 150 grams (but don’t quote me).
Camera Remote Control Options
I began with a simple remote shutter release. Amazon.com : JJC ES-628S2 Wireless Remote Controller For Sony A5100 HX60V A58 NEX-3NL A7 A7R A7S A3000 A5000 A6000 HX300 HX50V RX100II RX100III Replaces Sony Multi Connector : Camera & Photo
The JJC device worked well to about 250 feet. The receiver was Velcro mounted to the Solo body and is battery powered and the spiral remote cable attaches to the Sony. I mounted the radio control device to my Solo controllers so I could just drop my right thumb down to fire the shutter release.
As I shot more aerial images with the Solo, it was clear that in-flight controls over exposure settings would be a huge benefit particularly when shooting during the golden hours when the light is changing every minute. Bringing the drone to ground to fine tune exposure settings for HDR or Panos is a huge waste of time.
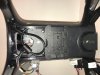
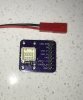
I recently went with remote devices supplied by VP Systems in Finland. Linnar Edesi was an amazing help to get this to work. The CamRemote works in the same manner as the JJC but it is capable of controlling zoom, manual and AutoFocus, shutter speed, Av and ISO and records video. Further custom controls are also possible; will look into those in the future. The CamRemote has a range of over 2km and is rock solid dependable. It is not internally battery powered like the JJC, so you have 2 options: dangle or strap on a 9v battery (which you can do) or tap into the un-used gimbal cable to power the CamRemote. I choose the latter to reduce weight (overall it is a lighter option than the JJC). I was able to find a Solo gimbal cable breakout board (gimbal cable plugs right into it) and tapped the 5v and GND header pins with a 2-wire cable to power the CamRemote. Alternatively, you can build a cable with the same Molex connector for the gimbal (I got some of those too). Lots of useful forum posts on this.
VP-Systems - Remote Controlled Video & Photography
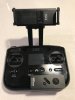
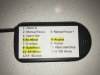
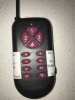
A 12-button controller radio is used to execute the remote control functions. A small receiver attaches to the CamRemote on the Solo with a wire antenna which receives the signal from the radio. For someone smarter than me, you could eliminate the radio controller (and the related receiver/antenna) and integrate the CamRemote with Pixhawk and ArduCopter and control the camera like you would a GoPro (but that’s beyond my pay grade and the Idiot’s guide is not yet published for me). However, I prefer keeping the camera settings on the separate radio as part of my shooting “workflow”. I get the Solo in position and stick it in place (think tripod), then take the remote radio device to check and adjust exposure and focus, then shoot. I am not sure I see much merit trying to integrate the remote control with the Solo’s controller or apps unless you plan to use a custom gimbal. With video where you fly and shoot at the same time, yes; still image capture where the drone needs to be still, not so much.
Mounting Options
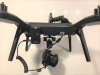
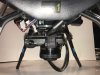
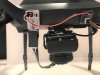
The first and easiest was simply bolting (used nylon screws and nuts) the Sony to an unused gimbal plate with an aluminum GoPro adapter (inverted to be used outside the Solo via the rubber balls). This put the Sony up in the nose just like the GP gimbal. I was initially concerned that the added off-center weight would cause flight stability issues but the Solo handled it just fine. Very, Very stable. Stitching HDR brackets and Panos was a lot cleaner than I ever thought would be possible on a drone. But sadly, this is not the case at the moment. See Tale of Woe below. Case of wine to anyone who helps me get the stability mojo back.
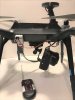
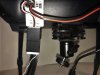
To get better camera adjustment capability, I substituted a light weight ballhead for the adapter ($10 for 2 on Amazon). Using nylon screws to squeeze down the dampener balls also worked well to reduce excessive swaying of the mount—there is an ideal point were mount/camera swinging and swaying is reduced and drone vibrations are filtered out (a bit like tuning a hung suspension turntable; I can advise on that too for any audiophiles out there).
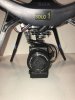
In addition to the ballhead, I experimented with an L bracket in order to get a vertical camera orientation (as one would use on a tripod). I use vertical for Panos. I used a lightweight aluminum bracket from my underwater photo supplies. I drilled alternative mounting holes so the bracket can be used for both horizontal and vertical orientations. Due to the cable locations, the L bracket puts less stress on the hdmi cable than the upside down/ballhead and I now prefer the L bracket to the ballhead.
As I was experimenting with the L bracket, I decided to try mounting the Sony more center by using the 4 screw holes on the accessory bay. After several failed attempts, Ian at the Imp Store came to the rescue.
3DR Solo UAV
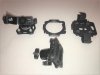
Ian has 3-D printed a nice quick release mounting plate that screws over the accessory bay. He also has a 2-piece Sony camera holder/adapter (it uses 2 velcro straps for quick removal) that will attach to the quick release plate placing the Sony in a direct downward facing orientation. Ian custom printed additional quick release plates for me to which I attached a ballhead and the L bracket. So now I can quick release among all 3 mounting options and not waste time unscrewing and screwing on the ground. Time kills. I have the quick release on 2 other Solos if needed.
However, moving the camera back on the drone over the accessory bay may/will cause magnetic interference errors to fire b/c the camera electronics are now closer to internal compasses, the external leg compass and any other sensors I have no clue about. I tried to mitigate this by installing a mast-mounted HERE GPS and removing the leg compass but I still get the MI error. So you have to fire up the Solo first with the camera dismounted off to the side and turned off, mount the CamRemote and turn it on, get GPS locked, then connect the HDMI cable and the CamRemote to the camera and mount it and, last, turn on the camera. Unfortunately, you have to do this each time you swap in a new battery. Hot swapping batteries still causes the MI error to fire. Not sure “hot swapping” is advisable in any event due to some weird battery readings I have experienced.
The quick release plate is INVALUABLE due to this MI PITA. When battery 1 wears down, you need to land (obviously), quick release the Sony, take it away from the Solo and turn it off, swap batteries, get GPS lock, reinstall Sony and turn it on. Time Me!! Without the quick release, this would take way too much time.
Stability Problems (Woe is ME): A subject of another thread…
Solo Calibration or Parameter Adjustments for Heavier Camera Payloads
At the time I installed the mast mounted HERE, I also upgraded that drone (and 2 others with mRo GPSs) to Open Solo. All of a sudden, all 3 drones were visibly shaking and whining when the Sony was mounted. The video feed was bouncing all over—not like before. This is not a case of a slight increase in vibrations. The drones now have major, visible shaking—full drone paroxysms. My smooth HDR brackets and Panos were now gone and slower shutter speeds were now unusable. I am currently struggling to figure out how the parameter settings are affected by the weight amount and distribution (e.g., are they optimized for a forward located GP gimbal). Through some parameter changes made through Mission Planner, the Solos have calmed down but they are not nearly as smooth as they once were. Aging batteries contributing?? Will do some battery upgrade experiments in the coming weeks. Motor upgrades? Perhaps PID tuning (whatever that is; I don’t even know what “PID” stands for), AutoTuning, more parameter tweaking, flight profiles etc…, all I know nothing about, are the hurdles to get over next.
Pictures to follow.
Jim
Much appreciated.
Setup Notes:
I use a Sony alpha series, APC C/25 MP sensor for drone images. I shoot Raw in continuous bracket mode most of the time.
HDMI to the Sony works fine and the live video feed from the camera comes through on Solex, SidePilot or the Solo app. The LCD display of the camera is shown with whatever display option you set on the camera so you can see the full exposure settings if you require-- as I do. Know your camera settings. If the camera is mounted upside down, you need to use Solex in “flip screen” mode to see a right side up image in the app.
For the new camera remote device, the drone and the camera remote equipment need to be on and connected to the Sony BEFORE the Sony can be turned on. If I need to be very precise about composition, I will use an iPad in lieu of the smaller Nexus android device (with a custom controller grip mount).
You’re gonna need leg extenders. Am working with another forum member on a gimbal for the Sony. The lens on the Sony is a 16-50mm zoom. Very light and decent optics but not great. Fun to be able to now adjust the power zoom in the air. I will likely go with a wider 9mm prime, which may alter the mounting choices and location.
Weight estimates: camera, lens, with battery is 14.2 oz/410grams; the Camera remote stuff and mounting gizmos add another 150 grams (but don’t quote me).
Camera Remote Control Options
I began with a simple remote shutter release. Amazon.com : JJC ES-628S2 Wireless Remote Controller For Sony A5100 HX60V A58 NEX-3NL A7 A7R A7S A3000 A5000 A6000 HX300 HX50V RX100II RX100III Replaces Sony Multi Connector : Camera & Photo
The JJC device worked well to about 250 feet. The receiver was Velcro mounted to the Solo body and is battery powered and the spiral remote cable attaches to the Sony. I mounted the radio control device to my Solo controllers so I could just drop my right thumb down to fire the shutter release.
As I shot more aerial images with the Solo, it was clear that in-flight controls over exposure settings would be a huge benefit particularly when shooting during the golden hours when the light is changing every minute. Bringing the drone to ground to fine tune exposure settings for HDR or Panos is a huge waste of time.
I recently went with remote devices supplied by VP Systems in Finland. Linnar Edesi was an amazing help to get this to work. The CamRemote works in the same manner as the JJC but it is capable of controlling zoom, manual and AutoFocus, shutter speed, Av and ISO and records video. Further custom controls are also possible; will look into those in the future. The CamRemote has a range of over 2km and is rock solid dependable. It is not internally battery powered like the JJC, so you have 2 options: dangle or strap on a 9v battery (which you can do) or tap into the un-used gimbal cable to power the CamRemote. I choose the latter to reduce weight (overall it is a lighter option than the JJC). I was able to find a Solo gimbal cable breakout board (gimbal cable plugs right into it) and tapped the 5v and GND header pins with a 2-wire cable to power the CamRemote. Alternatively, you can build a cable with the same Molex connector for the gimbal (I got some of those too). Lots of useful forum posts on this.
VP-Systems - Remote Controlled Video & Photography
A 12-button controller radio is used to execute the remote control functions. A small receiver attaches to the CamRemote on the Solo with a wire antenna which receives the signal from the radio. For someone smarter than me, you could eliminate the radio controller (and the related receiver/antenna) and integrate the CamRemote with Pixhawk and ArduCopter and control the camera like you would a GoPro (but that’s beyond my pay grade and the Idiot’s guide is not yet published for me). However, I prefer keeping the camera settings on the separate radio as part of my shooting “workflow”. I get the Solo in position and stick it in place (think tripod), then take the remote radio device to check and adjust exposure and focus, then shoot. I am not sure I see much merit trying to integrate the remote control with the Solo’s controller or apps unless you plan to use a custom gimbal. With video where you fly and shoot at the same time, yes; still image capture where the drone needs to be still, not so much.
Mounting Options
The first and easiest was simply bolting (used nylon screws and nuts) the Sony to an unused gimbal plate with an aluminum GoPro adapter (inverted to be used outside the Solo via the rubber balls). This put the Sony up in the nose just like the GP gimbal. I was initially concerned that the added off-center weight would cause flight stability issues but the Solo handled it just fine. Very, Very stable. Stitching HDR brackets and Panos was a lot cleaner than I ever thought would be possible on a drone. But sadly, this is not the case at the moment. See Tale of Woe below. Case of wine to anyone who helps me get the stability mojo back.
To get better camera adjustment capability, I substituted a light weight ballhead for the adapter ($10 for 2 on Amazon). Using nylon screws to squeeze down the dampener balls also worked well to reduce excessive swaying of the mount—there is an ideal point were mount/camera swinging and swaying is reduced and drone vibrations are filtered out (a bit like tuning a hung suspension turntable; I can advise on that too for any audiophiles out there).
In addition to the ballhead, I experimented with an L bracket in order to get a vertical camera orientation (as one would use on a tripod). I use vertical for Panos. I used a lightweight aluminum bracket from my underwater photo supplies. I drilled alternative mounting holes so the bracket can be used for both horizontal and vertical orientations. Due to the cable locations, the L bracket puts less stress on the hdmi cable than the upside down/ballhead and I now prefer the L bracket to the ballhead.
As I was experimenting with the L bracket, I decided to try mounting the Sony more center by using the 4 screw holes on the accessory bay. After several failed attempts, Ian at the Imp Store came to the rescue.
3DR Solo UAV
Ian has 3-D printed a nice quick release mounting plate that screws over the accessory bay. He also has a 2-piece Sony camera holder/adapter (it uses 2 velcro straps for quick removal) that will attach to the quick release plate placing the Sony in a direct downward facing orientation. Ian custom printed additional quick release plates for me to which I attached a ballhead and the L bracket. So now I can quick release among all 3 mounting options and not waste time unscrewing and screwing on the ground. Time kills. I have the quick release on 2 other Solos if needed.
However, moving the camera back on the drone over the accessory bay may/will cause magnetic interference errors to fire b/c the camera electronics are now closer to internal compasses, the external leg compass and any other sensors I have no clue about. I tried to mitigate this by installing a mast-mounted HERE GPS and removing the leg compass but I still get the MI error. So you have to fire up the Solo first with the camera dismounted off to the side and turned off, mount the CamRemote and turn it on, get GPS locked, then connect the HDMI cable and the CamRemote to the camera and mount it and, last, turn on the camera. Unfortunately, you have to do this each time you swap in a new battery. Hot swapping batteries still causes the MI error to fire. Not sure “hot swapping” is advisable in any event due to some weird battery readings I have experienced.
The quick release plate is INVALUABLE due to this MI PITA. When battery 1 wears down, you need to land (obviously), quick release the Sony, take it away from the Solo and turn it off, swap batteries, get GPS lock, reinstall Sony and turn it on. Time Me!! Without the quick release, this would take way too much time.
Stability Problems (Woe is ME): A subject of another thread…
Solo Calibration or Parameter Adjustments for Heavier Camera Payloads
At the time I installed the mast mounted HERE, I also upgraded that drone (and 2 others with mRo GPSs) to Open Solo. All of a sudden, all 3 drones were visibly shaking and whining when the Sony was mounted. The video feed was bouncing all over—not like before. This is not a case of a slight increase in vibrations. The drones now have major, visible shaking—full drone paroxysms. My smooth HDR brackets and Panos were now gone and slower shutter speeds were now unusable. I am currently struggling to figure out how the parameter settings are affected by the weight amount and distribution (e.g., are they optimized for a forward located GP gimbal). Through some parameter changes made through Mission Planner, the Solos have calmed down but they are not nearly as smooth as they once were. Aging batteries contributing?? Will do some battery upgrade experiments in the coming weeks. Motor upgrades? Perhaps PID tuning (whatever that is; I don’t even know what “PID” stands for), AutoTuning, more parameter tweaking, flight profiles etc…, all I know nothing about, are the hurdles to get over next.
Pictures to follow.
Jim