Custom built quad

Joined
Aug 27, 2015
Messages
1,007
Reaction score
710
Age
49
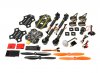
Don't know if this is of interest to anyone here, but I'm working on building a new frame for my pixhawk controlled 250, and I thought I'd share the first bits. I built the 250 with a CC3D flight controller to practice on before buying the Solo, and then added a mini pixhawk and GPS to learn the inns and outs of mission planner and autonomous flights before attempting them with the Solo. The few mishaps/crashes I've had have resulted in repair costs in the $15-$25 range, not the several hundred that the Solo would have been!

My only complaint about the 250 is that it's a butt ugly contraption, a bit on the heavy side, and with wires zip-tied all over the place, it's ripe for something coming loose or getting snagged on something and causing a crash. So, I thought I'd build a new frame specifically to be clean, light, strong and streamlined.

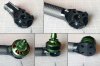
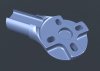
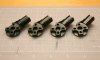
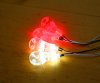
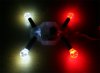
I need to clean up the tool paths a bit, but this is 1st draft of the motor mount. I milled it on a small desktop CNC milling machine out of a solid nylon rod, so it's light and darn near indestructible - not that glass filled nylon that breaks so easily. The ESCs will fit into the CF arms, and they're rated for over 2x the current the motors typically pull, so heat shouldn't be a problem now that they won't be in the airflow. I wanted the motor wires to pass cleanly through the mount into the arm, and I milled a similar slot on the bottom for the wires for a set of lights to be mounted on each arm. The mounts fit nice and snug in the CF tube, and will be secured by a single bolt.

Anyway, let me know if you want me to continue posting updates. Progress will be slow between work and family, but the motor mounts are the most complex part design/milling wise, so hopefully the rest progresses reasonably quickly.
 

Attachments

  • motor mount.jpg
    motor mount.jpg
    521 KB · Views: 50
Just curious why you're deciding to switch to a Pixhawk FC for a multi-rotor this size? If you plan on using it for FPV racing you may not want to risk an expensive FC.
 
Just curious why you're deciding to switch to a Pixhawk FC for a multi-rotor this size? If you plan on using it for FPV racing you may not want to risk an expensive FC.

Good question. Just for all the autonomous features. Not looking for a racing quad, it's cool to watch, but I'm not sure my reactions are quite good enough to do it myself! I wanted a smaller quad for the east of transportation, being able to fly it in tight spaces and not worrying too much about damage in a crash. And this size is still able to carry a fix mounted GoPro... even if just barely, which is also part of the reason behind building a super light but still strong frame. The flight controller is a PixFalcon, which is basically a mini pixhawk. With the GPS and a power module, it was only $120, so while it's more expensive than a CC3D or Naze32 or the like, it's still not THAT expensive, and it offers virtually all the features of a full size Pixhawk mines some extra aux RC and I2C ports.
 
Last edited:
  • Like
Reactions: FlexFanatic
It's a nice design - I love to try it out. What size are the CF arms? Maybe if you make the motor platform slightly larger than the motor it can protect the motors during accidental bumps or rough landings. If you post the stl files on thingiverse other people can also contribute to your design.
 
Thanks, I plan to have the rx antennae run through the legs like the Solo, so it should stand a good 3 inches or so off the ground. Not worried too much about damage since I can always just make a new part, and these motors are pretty cheap, I think $12 each.

The CF tubes are 16mm inside diameter (I think). I picked them specifically to fit the ESCs, and they JUST barely fit!

I'll have to look into making STL files. For milling, you don't always have a full, solid model of the part. All that I had to make in geometry are a few tubes, everything else is just outlines that I generate the tool paths from in my CAD program. Milling is pretty much the exact opposite of 3D printing - you start with a block of material and take everything you don't want away, as opposed to starting with nothing and only building up what you want.
 
Have you thought of making a few relief cuts on the cf arms to help dissipate heat from the ESC - maybe just enough without weakening the cf. I'm interested in your prototype because I want to build a search and rescue type drone that is in the medium range enough to to carry sensors but have a long flight time. So aluminum and cf would give the quad the rigidity and lightweight properties. That can aid in increasing flight time and reduce vibrations. As far as flight control systems I've tried APM for autonomous flight - it works well but you need patience and a lot of trial and error to make it perfect. I would assume that the pixfalcon is a more polished system.
DJI NAZA systems works great for my applications - still deciding on a few long range solutions for transmitter. Looking at dragonlink, tbs crossfire, and ezuhf. I'll keep monitoring your post - very interested in how the design pans out. Maybe it can be a good SAR drone.
 
I have thought about adding some cuts to the tubes, but I'd be worried that they would substantially weekend the arms. I have 3 thoughts on addressing ESC heat:

1- Use an ESC rated for a significant amount over what's needed to keep heat down right from the start. The ones I'm using are rated for continuous 20 amps, and the prop/motor combination I'm using should only pull about 10 amps at 100% throttle. So I have a 100% overhead, and in my flying so far, the ESCs barely get warm. Even with my heavy frame, the thing is like a rocket at full throttle, so I'm probably using significantly less than even the 10 amps in normal flying.

2- If heat is still an issue, possibly mount them inside the arm such that they conduct heat to the tube. Probably not optimal because of the tolerances needed, and anything to transfer the heat would probably need to be metal, adding weight and negating the whole point of putting the ESC inside the arm.

3- Make a larger opening for the wires in the mount part to allow airflow, and either design a body to channel air through and past the inside open ends of the arm tubes pulling air through, or seal the body and add a small fan on the bottom to pull air through the tubes and out the bottom. This could be a small computer case fan which would use very little power. You don't need much airflow, just enough that heat isn't just continually building up in the tubes with nowhere to go.

I'm hoping #1 pans out so I don't have to explore #2 or #3! I'd definitely experiment with adding some cuts/openings before proceeding to 2 or 3.

To be honest, I just love building stuff, and want to see how clean, light and strong a frame I can build. I'd also love to, at some point, build a totally weatherproof quad so I could get video in inclement weather. For now though, I just want to build something that I can strap a GoPro to and do some surveys and some more risky flights that I'd be reluctant to do with the Solo.

The Pixhawk does seem to be more refined than the APM. I've found it to be pretty easy to configure. The Falcon is basically a clone, just in a smaller form factor. It only has a single telemetry port, a single I2C port (beside the GPS/external comps ports), only 8 outputs (no aux, but you can apparently configure unused motor ports to operate servos). But for the tradeoff, it's a standard 36 x 36mm board and much cheaper.
What about using heatsinks?
HobbyKing ESC Heatsink Pack
 
What about using heatsinks?
HobbyKing ESC Heatsink Pack

Without airflow, I think all heatsinks would do is delay the problem - they'll absorb heat and probably radiate it a little better, but the inside of the arms will still just heat up reducing the ability of the heatsinks to remove heat from the ESCs.

I just got back from flying it, and I'm pretty confidant #1 will pan out - I spent an entire battery doing high speed passes, and full throttle climbs, landed and immediately felt the ESCs. They were barely warm. Sure, they're in the open now, but they're still covered in heat shrink and buried beneath wires, barrel connectors and zip ties. And it's not like there won't be ANY airflow inside the arms. The wind passing through the frame and the open ends on the inside will draw or push some air through. Given that they generate so little heat to start with, I'm thinking this will be fine.

Unfortunately, I got cocky trying to show my son some flips and crashed! No major damage, a broken set of props, a busted nylon standoff, and one motor might have a damaged bearing. I already have a spare... like I said earlier, it's nice to have a quad that repairs cost in the 10's of dollars, not hundreds!
 
  • Like
Reactions: Raybro
If you post the stl files on thingiverse other people can also contribute to your design.

I created a solid mesh of the mount, exported it as an STL and uploaded it to Thingiverse. It's not public yet, I guess I have to wait 24 hours after creating an account, but here's the STL if you want to play with it. I've never used a 3D printer, so if you run into issues with it, let me know and I'll see what I can do.
 

Attachments

  • motor_mount.jpg
    motor_mount.jpg
    142.7 KB · Views: 12
  • motor_mount_001.zip
    2.7 MB · Views: 5
Ha!

That's it so far! :D

I have all the parts slapped together on an FPV 250 frame, but I'm looking to rebuild it as light and clean as possible, hence putting the ESCs and wires into the arms.
 
Motor mounts are done... Gotta love repeatability!

On to the next step. I have 1.5mm CF sheet for the frame, and a design mostly set, just need to figure out the placement for all the components. I have a new set of motors on the way, and a circular polarized antenna for the video transmitter. Once they get here I can finalize the frame layout and start working on tool paths to cut it.
 

Attachments

  • 4mounts.jpg
    4mounts.jpg
    568.4 KB · Views: 11
image.jpeg Somebody just built your Quadcopter image.jpeg image.jpeg image.jpeg
 

Attachments

  • image.jpeg
    image.jpeg
    134.3 KB · Views: 11
Wow, that's pretty cool, love the simplicity of the landing gear. I can't wait for work to let up so I can continue on mine.

Thanks for posting. Love seeing what others have come up with.
 
Well, I'm still working on this thing, although the plans have changed a bit. When 3DR was having that clearance sale, I was able to pick up a bunch of Iris motors, and since I was building this to carry a camera, the bigger motors the better.

So... while I rethink the design a bit, I started testing some ideas on a smaller quad. Got the idea to mill the motor mounts out of clear ABS and illuminate them from the inside as opposed to just taping LEDs on the bottom. So here are a set of motor mounts, all wired up and shining like Christmas tree lights. These are for 1306 motors, so they're really small, they'll go in 10mm diameter CF tubes.

Really happy with how they turned out. They're pretty bright in a typically lit room, and really bright in the dark. And no wires showing... I hate the zip-tied look of most DIY quads.

mounts-jpg.2877
 

Attachments

  • Mounts.jpg
    Mounts.jpg
    1.3 MB · Views: 42
  • Like
Reactions: dml931
Looks really nice. You may not want to, but if you scruff up the surface of those with sandpaper so they are more opaque they will light up better and evenly - although more diffused
 
I've considered that. I'm going to take a scrap piece of the plastic and test it on that. They're pretty bright even without, but that'd definitely diffuse the light more. On the bigger ones, I'll probably mill some concentric circles on the bottoms with a V end mill which will have a similar result

I wonder if there's some type of mild acid I could etch the surface of the plastic a bit. It'd be hard to sand them evenly all over. A sand blaster would be perfect...

Here's how it looks in a dark room, I'll have to see when I get it in the air, but I think it'll be fine.

mini_quad-jpg.2878
 

Attachments

  • mini_quad.jpg
    mini_quad.jpg
    228.8 KB · Views: 35
Last edited:

New Posts

Members online

No members online now.

Forum statistics

Threads
13,096
Messages
147,753
Members
16,069
Latest member
Mr M