EDIT: Match to Stock connector, Type-D HDMI connector
Amphenol 10118242-001RLF, Digi-Key Part Number 609-4617-1-ND
I was able to replace a Gimbal’s micro-hdmi connector on the circuit board. @Solo Keith was kind enough to send me his failed gimbal, he’d ripped the connector off while installing the hdmi cable. This failure was a clean break from the board. No solder pads were damaged. I guess this is the benefit to lead-free solder, not a strong bond to the circuit board.
I had tried several times with a Molex connector and was constantly having the terminals bridge when adjusting into position on the pads while the solder was wet. I ended up using aWURTH 685119248123 Micro-HDMI from Mouser. This version of the connector has the pins supported, which kept the pins separated while aligning the connector in the wet solder to the pads. It appears similar to the factory connector in that its connector supported the pins as well.
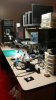
As seen in the photo the Wurth has two locator/pivot pins, I had to file those off to allow the connector to sit flush to the board. Otherwise the hidden set of terminal pins were high off the pads and would not contact the pads enough to wick the solder. I’m sure there is exact connector available, but you use what is available…
Anyway, the micro-hdmi connector has a blind row of terminals. A Hot-Air Solder station is really the only method to solder on the replacement. Also all work was done with the circuit board on the gimbal. I had removed the beauty plate with the dampers and then moved it away from the circuit board. I used a thermal barrier to place in between the BP and the circuit board. Controlling the hot air away from the gimbal’s hub kept all other components relatively free of most of the heat. I highly recommend a liberal amount of no-clean flux on and around the pads prior to the install.
I de-soldered the lead-free solder and the applied leaded solder to the pads and tab holes prior to placing the connector. Once the solder was wet I was able to align everything and then hold down with tweezers until solid.
Not trying to offer a tutorial. No video will be made. You either know how to solder or you don’t, this is not a simply repair. Just passing along a success story in repairing the micro-hdmi connector on the gimbal. I’ve yet to find anyone that has documented a repair with this size of HDMI connector. $10 in material and good as new.
If you’re interested in learning electronic repair I recommend watching IpadRehab on YouTube. Jessa is a great teacher and she offers lots of tips that will shorten the learning curve. I learned to apply more flux than I had been previously, it’s magic to the effort.
Amphenol 10118242-001RLF - 10118242-001RLF Amphenol FCI | Connectors, Interconnects | DigiKey
WURTH Micro HDMI Connector - http://www.mouser.com/ProductDetail/Wurth-Electronics/685119248123/?qs=sGAEpiMZZMtAYTMy7wxAr%2bWZla9XpLt87uO1JlG/8m2r%2bm2SnaHy/A==


Amphenol 10118242-001RLF, Digi-Key Part Number 609-4617-1-ND
I was able to replace a Gimbal’s micro-hdmi connector on the circuit board. @Solo Keith was kind enough to send me his failed gimbal, he’d ripped the connector off while installing the hdmi cable. This failure was a clean break from the board. No solder pads were damaged. I guess this is the benefit to lead-free solder, not a strong bond to the circuit board.
I had tried several times with a Molex connector and was constantly having the terminals bridge when adjusting into position on the pads while the solder was wet. I ended up using a
As seen in the photo the Wurth has two locator/pivot pins, I had to file those off to allow the connector to sit flush to the board. Otherwise the hidden set of terminal pins were high off the pads and would not contact the pads enough to wick the solder. I’m sure there is exact connector available, but you use what is available…
Anyway, the micro-hdmi connector has a blind row of terminals. A Hot-Air Solder station is really the only method to solder on the replacement. Also all work was done with the circuit board on the gimbal. I had removed the beauty plate with the dampers and then moved it away from the circuit board. I used a thermal barrier to place in between the BP and the circuit board. Controlling the hot air away from the gimbal’s hub kept all other components relatively free of most of the heat. I highly recommend a liberal amount of no-clean flux on and around the pads prior to the install.
I de-soldered the lead-free solder and the applied leaded solder to the pads and tab holes prior to placing the connector. Once the solder was wet I was able to align everything and then hold down with tweezers until solid.
Not trying to offer a tutorial. No video will be made. You either know how to solder or you don’t, this is not a simply repair. Just passing along a success story in repairing the micro-hdmi connector on the gimbal. I’ve yet to find anyone that has documented a repair with this size of HDMI connector. $10 in material and good as new.
If you’re interested in learning electronic repair I recommend watching IpadRehab on YouTube. Jessa is a great teacher and she offers lots of tips that will shorten the learning curve. I learned to apply more flux than I had been previously, it’s magic to the effort.
Amphenol 10118242-001RLF - 10118242-001RLF Amphenol FCI | Connectors, Interconnects | DigiKey
WURTH Micro HDMI Connector - http://www.mouser.com/ProductDetail/Wurth-Electronics/685119248123/?qs=sGAEpiMZZMtAYTMy7wxAr%2bWZla9XpLt87uO1JlG/8m2r%2bm2SnaHy/A==
Last edited: