
Well, I have a PC so am I better off working off the SD card or transferring to my SSD? What about the H.264 issue in Resolve?If I'm working on my PC, I rarely xfer footage; I'll cut straight off the card (assuming it's a "for fun" flight). Otherwise, I Xfer to a HDD, and edit directly from there. If I'm cutting on my Mac, I'll convert/transcode to ProRes during the xfer. HTH?


You are using an out of date browser. It may not display this or other websites correctly.
You should upgrade or use an alternative browser.
You should upgrade or use an alternative browser.
- Joined
- Sep 3, 2015
- Messages
- 592
- Reaction score
- 435
- Age
- 61
Well, I have a PC so am I better off working off the SD card or transferring to my SSD? What about the H.264 issue in Resolve?
You're never "better off" for a few reasons.
-your card may be slow....(I'm fortunate in being given the best/fastest flavor of the month for 'real' work and frequently MicroSD's are tossed after a project)
-you then have no archive.
In my case, I frequently only have small bits I want to keep (these are called "selects") I toss the full clip on the timeline, make my selects, and only save those segments out of the clip.
.264 isn't really an issue in Resolve. The reviewer is using a Mac, and no MPG format does well on a mac. Maybe someday Apple will play well with other kids.
")
If I'm working on my PC, I rarely xfer footage; I'll cut straight off the card (assuming it's a "for fun" flight). Otherwise, I Xfer to a HDD, and edit directly from there. If I'm cutting on my Mac, I'll convert/transcode to ProRes during the xfer. HTH?
Are you using standard ProRes or HQ? Erik has mentioned that HQ won't make a difference for GoPro footage further back in this thread, what is your opinion?
Would you ever use CineForm export from GoPro studio? Do you think the CineForm codec is more CPU intensive than ProRes on Mac?
- Joined
- Jun 14, 2015
- Messages
- 1,553
- Reaction score
- 837
- Age
- 124
Yeah. I don't know Power Director, but assuming it has decent color controls this is what you want to do in this order.Thanks! Now I get it.
I just started experimenting with 2.7K, 30 FPS, wide, pro tune on, white balance @ native, GoPro color off, 400 ISO. You're right- it almost looks black & white.
I am using Cyberlink Power Director 13 for post and I can't get the footage to look as "colorful" as it is if I let GoPro process it. I've been concentrating mostly on saturation & vibrancy but that only goes so far.
Any tips?
- Fix exposure (blacks first, whites, then midtones last)
- Adjust overall temperature (i.e. tint)
- Boost saturation
So I'm going to throw a ton at you below. I'm going to oversimplify and not thoroughly explain everything. Hopefully it's enough to get you started. At the very least you can research some of the terms, etc. I'm not even sure Power Director has scopes, which you'll need, or the ability to adjust exposure independently in the blacks/shadows, midtones, and whites/light areas. The ability to do that with exposure is kind of critical.
This is also a valid approach in Davinci Resolve, with some tweaks. But that's a pretty hardcore program. Anyway, here goes some extra info on the 3 steps above. (Sorry it was written quickly).
1. Fix exposure.
To fix exposure it's best to have a wave form scope showing luma levels. Luma is the measure of how bright or dark a pixel is.
Anyway, start by brining down exposure in the blacks. You should see the luma waveform graph start to stretch toward black. If there is something black in the scene, then at least part of your luma graph should be touching 0.
Scrub through your video and look for frames where the luma wave form dips below 0. If you find that, then push exposure in your blacks up a bit. Keep doing that until you find a black level where you can scrub through your whole video and the waveform never dips below 0.
Next adjust your whites exposure. Often I leave this alone. In general you don't want your whites to exceed the top line on your graph (I'm way over simplifying here, the limit is 940 lre). You can allow some whites to spike over the top of the graph if they corespond to specular highlights off metal or water. We can legalize those areas later.
Last, adjust midtone exposure to taste. push your midtone exposure down to get get a richer, sharper look. Push it up for a more washed out look.
2. Adjust overall temperature (i.e. tint)
Since we shot the footage with "native" white balance, the GoPro didn't do anything to compensate colors. We need to adjust the color balance ourselves. Many apps have many tools for this. Personally I temporarily crop the image so that only a white section of the image is visible. That's easy in the winter. Other times of year I try to find something that should be white, or at least natural grey.
First I crop the image to show only white (or grey). Then I pull up an RGB parade scope. Then I push the color hue controls until the red, green, and blue graphs all peak at the same level. Even parts red green and blue = neutral color.
Once I've got that balanced, I uncrop and then tweak. Often I'll push a touch of blue or teal into shadows, and add warmth to the highlights.
3. Boost saturation
Just crank up the saturation until it looks horrible. Then cut that level in half. If it looks fine, then it's probably still over saturated. Walk away and then come back to get a fresh look. Just remember, the "GoPro" look that everyone loves is highly saturated - so don't be afraid to push it.
- Joined
- Jun 14, 2015
- Messages
- 1,553
- Reaction score
- 837
- Age
- 124
Search for Denver riddle tutorials.Jeez, what I would give to spend a day with guys like you, Erik, Jubalr, Pdxsteve, Pyrate and some others. I can build a motorcycle in my sleep, like Roland probably can with quads but this stuff is all Greek to me. I learn so much better by watching and instruction than I do by reading. Do any of you guys have websites or channels where your stuff can be viewed?
I downloaded and installed DaVinci Lite, I cant even figure out how to get a clip in there. Guess it's time to search some tutorials. I'm at the Windows Movie Maker level and half-assed learning Cyberlink Power Producer and Premier Elements 14 (note the "half-assed"). For camera settings, I punch in whatever you guys say but because I know nothing about post-editing, it probably does me no good.
Thanks so much for the info you guys provide to people like me. I don't contribute much but I read every one of the posts you guys write.
Jerry
- Joined
- Jun 14, 2015
- Messages
- 1,553
- Reaction score
- 837
- Age
- 124
Yeah, plain old ProRes 422 is 10bit - h.264 is 8bit. So there is plenty of "headroom"Are you using standard ProRes or HQ? Erik has mentioned that HQ won't make a difference for GoPro footage further back in this thread, what is your opinion?
Would you ever use CineForm export from GoPro studio? Do you think the CineForm codec is more CPU intensive than ProRes on Mac?
If you are planning to do a complex edit with titles, layers, and effects with lots of alpha transparency, then you might want to skip up to ProRes 444. But there will be no image quality improvement going above 422. If you do a comparison, ProRes 422 is effectively identical to the original GoPro h.264 footage uncompressed.
What are you using for ProRes transcodes? Compressor, Adobe Media Encoder, 5DtoRGB lite, FCP or Resolve?
Sent from my iPhone using Tapatalk
Sent from my iPhone using Tapatalk
- Joined
- Jun 14, 2015
- Messages
- 1,553
- Reaction score
- 837
- Age
- 124
Compressor, FCP, and Resolve. Mostly FCP.What are you using for ProRes transcodes? Compressor, Adobe Media Encoder, 5DtoRGB lite, FCP or Resolve?
Sent from my iPhone using Tapatalk
- Joined
- Jun 14, 2015
- Messages
- 1,553
- Reaction score
- 837
- Age
- 124
Not really. Compressor I assume... but Final Cut is fast enough. It does a lot in the background when you pause working for a few seconds (if enable background processing). Basically nothing's really fast enough.Anyone of them seem faster than the other?
Sent from my iPhone using Tapatalk
- Joined
- Sep 3, 2015
- Messages
- 592
- Reaction score
- 435
- Age
- 61
Yeah, plain old ProRes 422 is 10bit - h.264 is 8bit. So there is plenty of "headroom"
If you are planning to do a complex edit with titles, layers, and effects with lots of alpha transparency, then you might want to skip up to ProRes 444. But there will be no image quality improvement going above 422. If you do a comparison, ProRes 422 is effectively identical to the original GoPro h.264 footage uncompressed.
Bear in mind that laying titles, layers, etc ON TOP of the GoPro sourced footage doesn't make a whit of difference as to what the source footage transcode is. If you're doing compositing WITH the source footage, it makes quite a difference.
For me, I don't waste my time with ProRes unless I have no choice. Cineform is less heavy, similar to 422, and can be decoded and written to in many other applications. Since the source footage is 8bit, going to HQ does very, very little outside of giving you a tiny bit of headroom for _deep_ (as in, I screwed up my settings and need a lot of fixing) color correction. ProRes HQ preserves 10 bits vs the 8 but the difference is marginal.
- Joined
- Jun 14, 2015
- Messages
- 1,553
- Reaction score
- 837
- Age
- 124
Either 10bit or 12bit depending on settingsCineForm is 10bit?
Sent from my iPhone using Tapatalk
It's similar to ProRes. It's an editing codec (or intermediate), meaning that like ProRes, even though the file sizes are bigger, it easier to decode - it's less processor intensive than heavily compressed h.264. That makes it faster to work with when you apply transitions, effects, titles, or color grade.
Last edited:
Ok, thanks- think I'll keep working of the SSD.You're never "better off" for a few reasons.
-your card may be slow....(I'm fortunate in being given the best/fastest flavor of the month for 'real' work and frequently MicroSD's are tossed after a project)
-you then have no archive.
In my case, I frequently only have small bits I want to keep (these are called "selects") I toss the full clip on the timeline, make my selects, and only save those segments out of the clip.
.264 isn't really an issue in Resolve. The reviewer is using a Mac, and no MPG format does well on a mac. Maybe someday Apple will play well with other kids.
- Joined
- Sep 3, 2015
- Messages
- 592
- Reaction score
- 435
- Age
- 61
Not really. Compressor I assume... but Final Cut is fast enough. It does a lot in the background when you pause working for a few seconds (if enable background processing). Basically nothing's really fast enough.
on a mac, this is so. On a PC, not so much. The decoder is part of the CPU in addition to GPU.
Not my intent to start a Mac/PC debate, but there are huge differences on the video side.
Erik- thank you very much! That gives me some specifics to work with. Haven't had time to see if PD has scopes but I'll find out. Looks like Resolve has them but I need to learn more about that.Yeah. I don't know Power Director, but assuming it has decent color controls this is what you want to do in this order.
- Fix exposure (blacks first, whites, then midtones last)
- Adjust overall temperature (i.e. tint)
- Boost saturation
So I'm going to throw a ton at you below. I'm going to oversimplify and not thoroughly explain everything. Hopefully it's enough to get you started. At the very least you can research some of the terms, etc. I'm not even sure Power Director has scopes, which you'll need, or the ability to adjust exposure independently in the blacks/shadows, midtones, and whites/light areas. The ability to do that with exposure is kind of critical.
This is also a valid approach in Davinci Resolve, with some tweaks. But that's a pretty hardcore program. Anyway, here goes some extra info on the 3 steps above. (Sorry it was written quickly).
1. Fix exposure.
To fix exposure it's best to have a wave form scope showing luma levels. Luma is the measure of how bright or dark a pixel is.
Anyway, start by brining down exposure in the blacks. You should see the luma waveform graph start to stretch toward black. If there is something black in the scene, then at least part of your luma graph should be touching 0.
Scrub through your video and look for frames where the luma wave form dips below 0. If you find that, then push exposure in your blacks up a bit. Keep doing that until you find a black level where you can scrub through your whole video and the waveform never dips below 0.
Next adjust your whites exposure. Often I leave this alone. In general you don't want your whites to exceed the top line on your graph (I'm way over simplifying here, the limit is 940 lre). You can allow some whites to spike over the top of the graph if they corespond to specular highlights off metal or water. We can legalize those areas later.
Last, adjust midtone exposure to taste. push your midtone exposure down to get get a richer, sharper look. Push it up for a more washed out look.
2. Adjust overall temperature (i.e. tint)
Since we shot the footage with "native" white balance, the GoPro didn't do anything to compensate colors. We need to adjust the color balance ourselves. Many apps have many tools for this. Personally I temporarily crop the image so that only a white section of the image is visible. That's easy in the winter. Other times of year I try to find something that should be white, or at least natural grey.
First I crop the image to show only white (or grey). Then I pull up an RGB parade scope. Then I push the color hue controls until the red, green, and blue graphs all peak at the same level. Even parts red green and blue = neutral color.
Once I've got that balanced, I uncrop and then tweak. Often I'll push a touch of blue or teal into shadows, and add warmth to the highlights.
3. Boost saturation
Just crank up the saturation until it looks horrible. Then cut that level in half. If it looks fine, then it's probably still over saturated. Walk away and then come back to get a fresh look. Just remember, the "GoPro" look that everyone loves is highly saturated - so don't be afraid to push it.
I particularly appreciate the information you and wingsuit and everybody else have shared here.
- Joined
- Sep 3, 2015
- Messages
- 592
- Reaction score
- 435
- Age
- 61
Not really. Compressor I assume... but Final Cut is fast enough. It does a lot in the background when you pause working for a few seconds (if enable background processing). Basically nothing's really fast enough.
on a mac, this is so. On a PC, not so much. The decoder is part of the CPU in addition to GPU.
Not my intent to start a Mac/PC debate, but there are huge differences on the video side.
MadDog, do you know much about EQ for audio? Color correction is the same thing. Blacks=Bass. Whites=Treble. Midrange=skintones.Erik- thank you very much! That gives me some specifics to work with. Haven't had time to see if PD has scopes but I'll find out. Looks like Resolve has them but I need to learn more about that.
I particularly appreciate the information you and wingsuit and everybody else have shared here.
Be cautious boosting saturation; a lot of stuff is over saturated, and (at least in the pro video community) it's laughed at and cried over quite a bit.
Bear in mind that .264 often needs a small kick to yellow, see corrector here. In upper left, I've left the image untouched with only a smidge of sat added.

Whites are heavy; If there were time, I'd have post-relit the Transformer standup in the background.
The audio analogy is perfect- much easier to relate to! Tanks mucho amigo!on a mac, this is so. On a PC, not so much. The decoder is part of the CPU in addition to GPU.
Not my intent to start a Mac/PC debate, but there are huge differences on the video side.
MadDog, do you know much about EQ for audio? Color correction is the same thing. Blacks=Bass. Whites=Treble. Midrange=skintones.
Be cautious boosting saturation; a lot of stuff is over saturated, and (at least in the pro video community) it's laughed at and cried over quite a bit.
Bear in mind that .264 often needs a small kick to yellow, see corrector here. In upper left, I've left the image untouched with only a smidge of sat added.
View attachment 2428
View attachment 2429
Whites are heavy; If there were time, I'd have post-relit the Transformer standup in the background.
I thought the bottom left image was a radar scope- snow storm movin through.
The upper photo- there's a "block" that's lighter around the transformer. Is that a before/after window?
Oh, one other thing- is the objective of color grading/correction to make the video look just as if you were viewing it in person or to make it look even better? (I'm not even sure that makes sense- you know what I mean).
- Joined
- Jun 14, 2015
- Messages
- 1,553
- Reaction score
- 837
- Age
- 124
Color correction is for making your image look like it did in real life. Color grading is making adjustments to create a certain look.Oh, one other thing- is the objective of color grading/correction to make the video look just as if you were viewing it in person or to make it look even better? (I'm not even sure that makes sense- you know what I mean).
Most people color correct their clips first to establish a consistent baseline, and then they grade to achieve a look.
- Joined
- Sep 3, 2015
- Messages
- 592
- Reaction score
- 435
- Age
- 61
The audio analogy is perfect- much easier to relate to! Tanks mucho amigo!
I thought the bottom left image was a radar scope- snow storm movin through.
The upper photo- there's a "block" that's lighter around the transformer. Is that a before/after window?
Oh, one other thing- is the objective of color grading/correction to make the video look just as if you were viewing it in person or to make it look even better? (I'm not even sure that makes sense- you know what I mean).
Erik best explained the differences between correction and grading. Correction gets selects/clips/video to its most "natural/correct" look as to what your eye saw when it was shot, fixing issues of white balance, lighting errors, etc. In the audio realm, we'd EQ each channel's instrument on a mixing panel so that things are "proper" in the mix. Then, we'll apply an EQ, compressor, maximizer, sonic enhancer, etc to bring the rest of the mix to a single 'sound.'
Grading is an overall, project look. Think of motion pictures like "Traffic." Each shot was corrected, but later graded with colorations applied per scene, to give it an overall feel of "cold" or "warm." The entire picture is either yellow or blue overlay.
Here's an example;
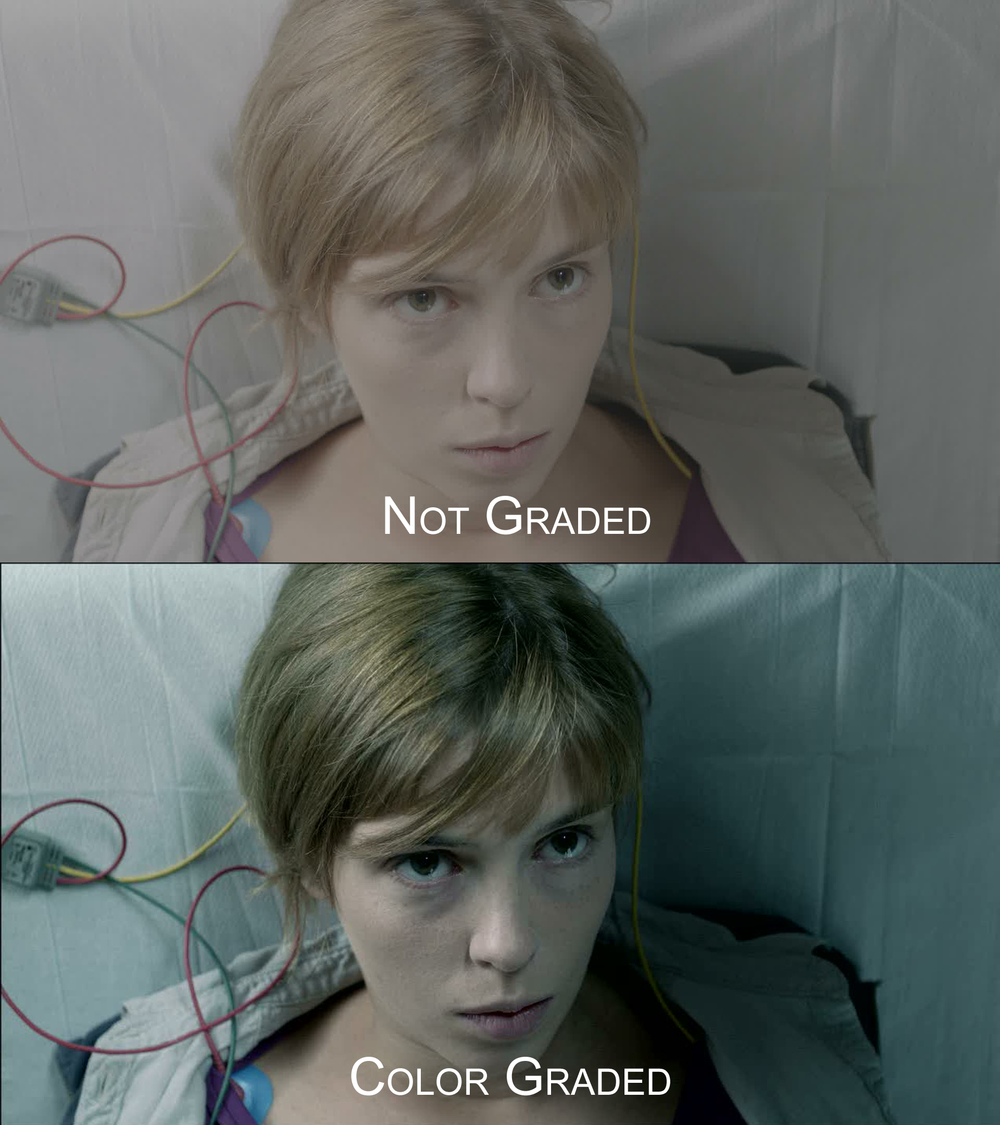
Here is a grouping of gradings that you'd apply post-correction.

My company develops gradings for Sony called "CineLooks."
And yes, in the upper left corner of the previously posted image is a "before/after" or rather "Color bypassed" and "Color Preview."
Similar threads
- Locked
- Replies
- 50
- Views
- 2K
- Replies
- 2
- Views
- 2K
New Posts
-

-

-
 Free Music / SFX Resource for Your Videos - Over 2000 Tracks
- Latest: Eric Matyas
-
-